The Kepler Track is a spectacular 60-kilometer loop trail in Fiordland National Park, ranked among New Zealand’s nine Great Walks. This complete guide covers everything you need to know about hiking the Kepler Track, from booking huts to day-by-day itineraries, packing lists, and insider tips for an unforgettable tramping experience.
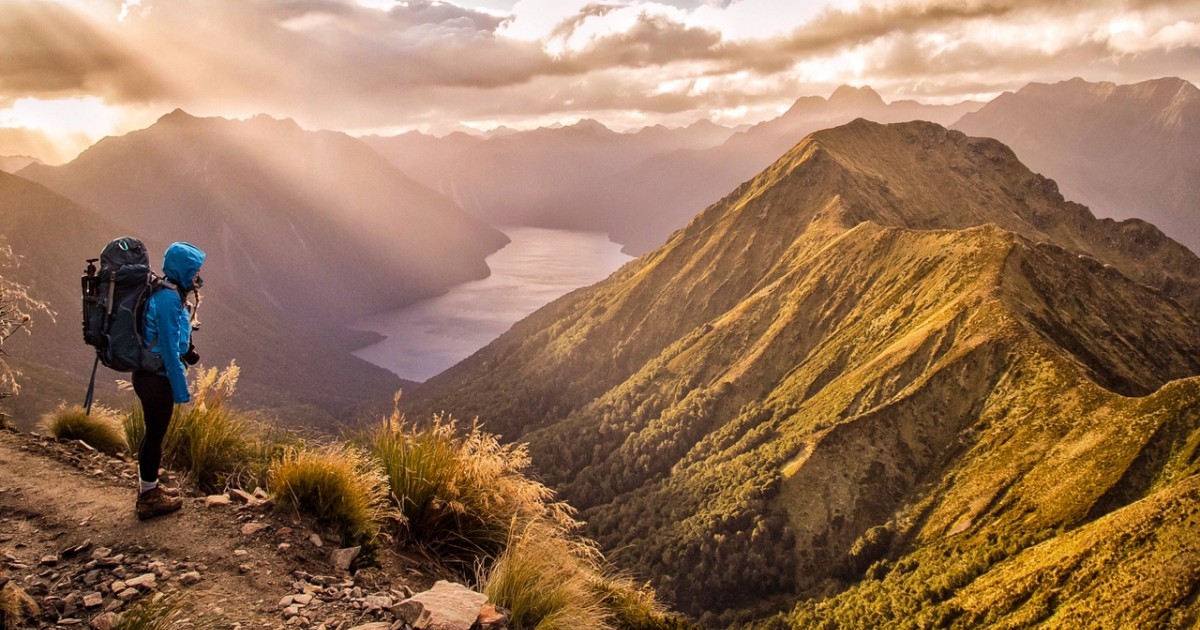
Table of Contents
- Quick Kepler Track Facts
- About the Kepler Track
- How to Book the Kepler Track
- Kepler Track Day-by-Day Itinerary
- Best Time to Hike the Kepler Track
- What to Pack for the Kepler Track
- Kepler Track Day Walks
- Getting to the Kepler Track
- Kepler Track Difficulty and Fitness Requirements
- Safety on the Kepler Track
- Comparing the Kepler Track to Other Great Walks
- Frequently Asked Questions
- Essential Tips for Hiking the Kepler Track
- Kepler Track for International Visitors
- Environmental Responsibility
- Training Plan for the Kepler Track
- Kepler Track History and Culture
- Guided vs Independent Hiking
- After the Kepler Track: Recovery and Next Steps
- Conclusion
Quick Kepler Track Facts
- Distance: 60 kilometers (37 miles) loop
- Duration: 3-4 days
- Difficulty: Moderate to challenging
- Location: Fiordland National Park, near Te Anau
- Highest Point: 1,472 meters at Mount Luxmore ridgeline
- Best Time: October to April (summer season)
- Hut Cost: $75-$140 NZD per night (seasonal pricing)
- Classification: New Zealand Great Walk
About the Kepler Track
The Kepler Track offers hikers a diverse tramping experience through beech forests, alpine ridges, wetlands, and lakeshores. Built in 1988, this track was specifically designed to showcase the best of Fiordland’s landscapes while reducing pressure on the more famous Milford and Routeburn tracks.
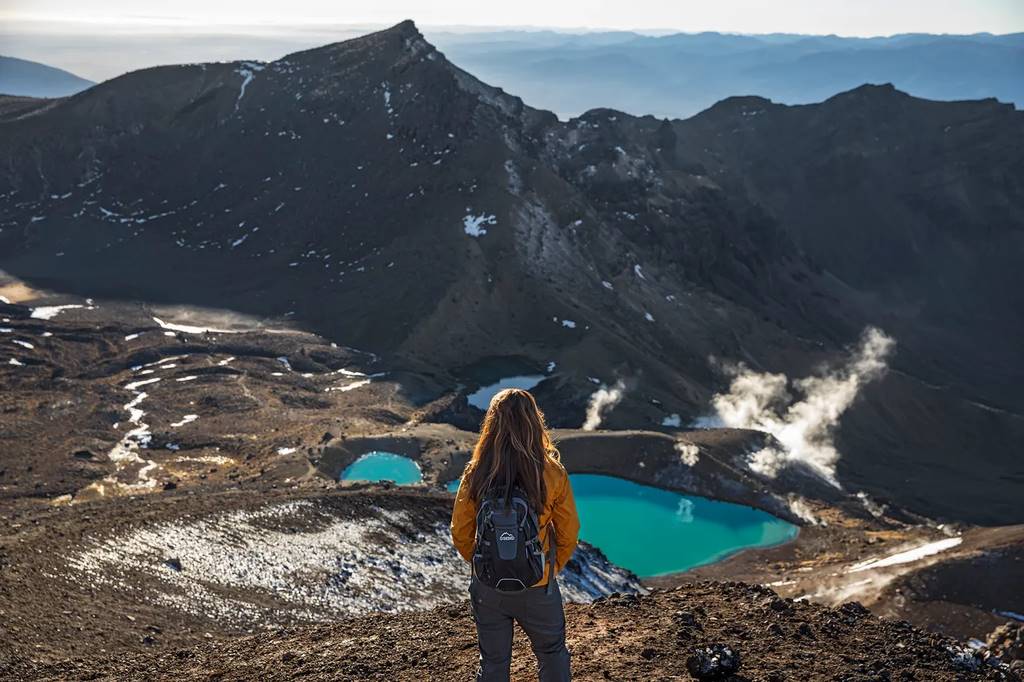
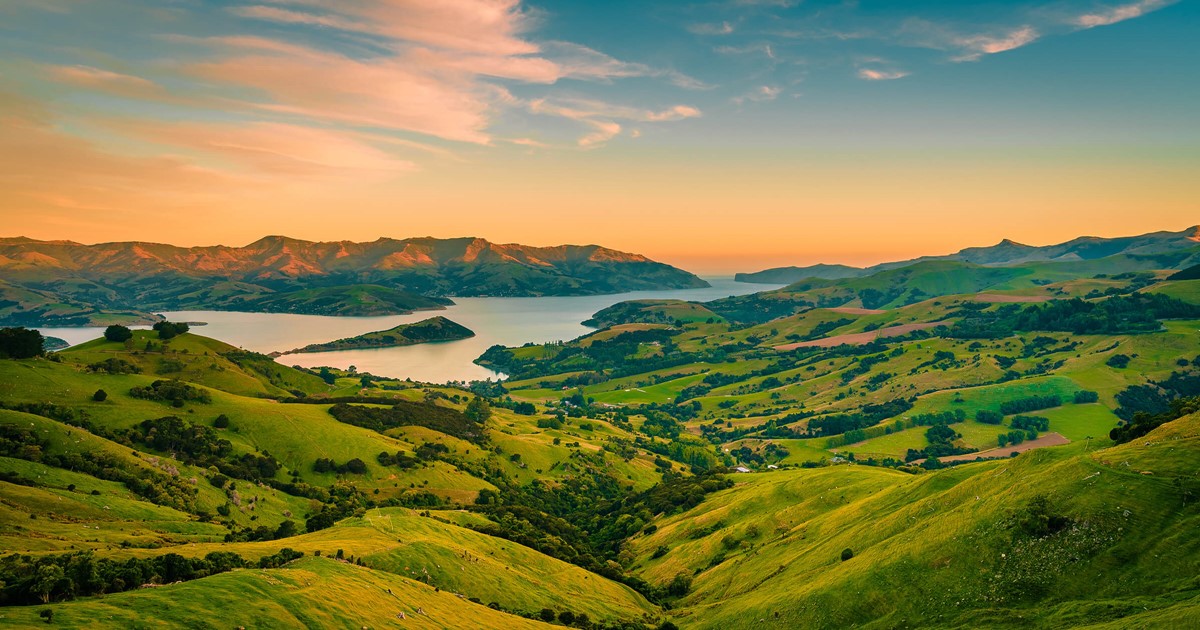
Starting and finishing near Te Anau, the Kepler Track forms a convenient loop, eliminating the need for complex shuttle arrangements. The trail’s highlight is the exposed alpine section along the ridgeline between Luxmore Hut and Iris Burn Hut, offering panoramic views of Lake Te Anau, Lake Manapouri, and the surrounding Fiordland wilderness.
What Makes the Kepler Track Special
The Kepler Track stands out among New Zealand’s Great Walks for several reasons:
Alpine Ridgeline: The 11-kilometer ridge walk above the bushline delivers stunning 360-degree views across Fiordland National Park. On clear days, you can see for hundreds of kilometers across mountain ranges, glacial valleys, and pristine lakes.
Loop Configuration: Unlike most Great Walks that require shuttle logistics, the Kepler Track’s loop design brings you back near your starting point, making transportation straightforward.
Wildlife Encounters: The track passes through diverse ecosystems home to native birds, including kea (alpine parrots), tui, bellbirds, and fantails. Lucky hikers may spot the rare takahe in the alpine sections.
Accessible Yet Remote: Despite starting just five kilometers from Te Anau, the track quickly immerses you in wilderness, offering genuine backcountry experiences without extreme isolation.
How to Book the Kepler Track
The Kepler Track operates on a booking system managed by the Department of Conservation (DOC). During the Great Walks season (late October to late April), you must book hut spaces in advance. Here’s everything you need to know about securing your spot.
Booking Timeline and Strategy
When Bookings Open: Hut bookings for the following summer season open online in early July each year. Popular dates fill within hours, sometimes minutes.
Peak Season: December 26 to early February is extremely competitive. Book immediately when reservations open if you want these dates.
Shoulder Season: November, early December, March, and April offer excellent hiking with better availability and often clearer weather.
Last-Minute Availability: Check the DOC website regularly. Cancellations do occur, and you can sometimes snag spots a few weeks before your intended dates.
Booking Process
- Visit the DOC website booking system
- Create an account if you don’t have one
- Select your start date and direction (most hikes counterclockwise)
- Choose your huts for each night
- Pay online (credit card required)
- Receive confirmation email with booking number
Kepler Track Huts and Costs
The track features three main huts with full Great Walks facilities:
Luxmore Hut
- Capacity: 54 bunks
- Facilities: Gas cooking, heating, toilets, tables, cold water
- Distance from start: 13.8 km
- Cost: $75-$140 NZD (seasonal)
Iris Burn Hut
- Capacity: 50 bunks
- Facilities: Gas cooking, heating, toilets, tables, cold water
- Distance from Luxmore: 14.6 km
- Cost: $75-$140 NZD (seasonal)
Moturau Hut
- Capacity: 40 bunks
- Facilities: Gas cooking, heating, toilets, tables, cold water
- Distance from Iris Burn: 16.2 km
- Cost: $75-$140 NZD (seasonal)
All huts have mattresses on bunks but no bedding. You must bring your own sleeping bag and pillow. Huts have gas stoves for cooking, but you must bring your own cookware and food.
Off-Season (May to October)
During the winter months, the Kepler Track operates as a Backcountry Hut Track. Bookings aren’t required, and huts cost significantly less ($15 NZD with an Annual Hut Pass or $5 per night). However, winter hiking requires alpine experience, avalanche awareness, and appropriate gear. The exposed ridgeline section can be extremely dangerous with snow, ice, and severe weather.
Kepler Track Day-by-Day Itinerary
Most hikers complete the Kepler Track in 3-4 days. Here’s a detailed breakdown of the standard counterclockwise route, which is most popular because it tackles the challenging alpine section when you’re fresh.
Day 1: Control Gates to Luxmore Hut (13.8 km, 5-6 hours)
Elevation Gain: 885 meters
Difficulty: Moderate to challenging
Highlights: Forest tramping, limestone bluffs, first mountain views
Your Kepler Track adventure begins at the Control Gates, accessible via a five-kilometer walk or water taxi from Te Anau. The trail starts gently through beech forest alongside the Waiau River before turning inland.
The climb to Luxmore Hut is steady and relentless, gaining nearly 900 meters through mountain beech forest. As you climb, watch for native birds including robins, fantails, and tomtits. The forest transitions from mixed beech at lower elevations to mountain beech higher up.
About two hours into your climb, you’ll pass limestone bluffs with interesting rock formations. The final approach to Luxmore Hut breaks above the treeline, offering your first alpine views across Lake Te Anau and the surrounding peaks.
Luxmore Hut sits at 1,085 meters in elevation in a spectacular alpine basin. Arrive with enough daylight to explore the area and catch the sunset views. If the weather permits and you have energy, a 15-minute side trip to the nearby cave offers a fun addition.
Day 2: Luxmore Hut to Iris Burn Hut (14.6 km, 5-7 hours)
Elevation Gain: 387 meters
Elevation Loss: 1,046 meters
Difficulty: Moderate (weather dependent, can be challenging)
Highlights: Alpine ridgeline, panoramic views, Mount Luxmore summit
Day two is the highlight of the Kepler Track, featuring the spectacular alpine ridgeline traverse. Weather makes or breaks this section, so check conditions with hut wardens and start early.
The day begins with a climb above Luxmore Hut to the ridgeline. Once on top, you’re rewarded with breathtaking 360-degree views. The track follows the exposed ridge for about 11 kilometers above the bushline, with magnificent panoramas of Lake Te Anau, Lake Manapouri, and the Kepler Mountains.
Mount Luxmore Side Trip (20 minutes return): About 45 minutes from the hut, a marked side trail leads to the summit at 1,472 meters. On clear days, this is absolutely worth the detour for even more expansive views.
The ridgeline walk is mostly undulating with some steep sections. You’ll pass tarn pools, alpine vegetation, and potentially spot kea (alpine parrots) that often interact with hikers. The track is well-marked with orange poles, essential in poor visibility.
After several hours above the bushline, the track descends steeply through the forest towards Hanging Valley. The descent is knee-challenging but eases once you reach Hanging Valley Shelter, a good lunch spot with water and toilets.
From the shelter, it’s an easy walk through the forest to Iris Burn Hut, located beside a beautiful cascading waterfall.
Day 3: Iris Burn Hut to Moturau Hut (16.2 km, 5-6 hours)
Elevation Gain: Minimal
Elevation Loss: 550 meters
Difficulty: Easy to moderate
Highlights: Forest tramping, waterfalls, Iris Burn gorge
Day three offers a welcome reprieve after the alpine challenge. The track descends gradually through beech forest, following Iris Burn stream through a scenic gorge.
The day begins with a gentle descent along the Iris Burn, crossing several swing bridges. The forest here is lush with ferns, mosses, and ancient beech trees. This section is particularly beautiful after rain, when waterfalls cascade down the rocky gorge walls.
About halfway through, you’ll reach the Big Slip, a massive landslide area from the 1980s. The track crosses the slip zone on a well-maintained path. This open area provides views back toward the mountains you traversed yesterday.
The track eventually leaves Iris Burn and continues through red beech forest, descending gradually toward the Waiau River valley. The walking is easy and pleasant, allowing you to enjoy the forest environment.
Moturau Hut is the smallest and most intimate of the three Great Walks huts on the Kepler Track. Located on river terraces, it offers a peaceful setting. The hut overlooks wetlands where you might spot waterfowl during quiet evening hours.
Day 4: Moturau Hut to Rainbow Reach (15.4 km, 4-5 hours)
Elevation Gain: Minimal
Elevation Loss: 200 meters
Difficulty: Easy
Highlights: Wetlands, lakeside walking, Loop Track completion
The final day is the easiest section of the Kepler Track, following the Waiau River downstream through wetlands and beech forest back to civilization.
The track traverses river terraces and wetland areas through red and silver beech forest. This is flat, easy walking with numerous swing bridges crossing side streams. The forest is particularly atmospheric in morning mist, with shafts of light filtering through the canopy.
About three hours from Moturau Hut, you’ll reach the Shallow Bay swing bridge, offering views across Lake Te Anau toward the mountains you traversed earlier in your journey. From here, it’s an easy walk along the lakeshore to Rainbow Reach, the official end of the loop.
From Rainbow Reach, most hikers either arrange shuttle pickup or walk the additional 5.3 kilometers back to the Control Gates parking area. Some choose to take a water taxi from Brod Bay back to Te Anau for a scenic finish.
Best Time to Hike the Kepler Track
The Kepler Track is hikeable year-round, but conditions and facilities vary dramatically by season.
Summer Season (Late October to Late April)
This is the Great Walks season with full hut facilities, compulsory bookings, and higher costs. Summer offers the best weather, though Fiordland can be rainy any time of year.
October to November: Spring conditions with blooming alpine flowers, cooler temperatures, and fewer crowds. Weather can be unpredictable, but availability is better than peak summer.
December to February: Peak season with the warmest temperatures and the longest daylight hours. December 26 to early February is extremely busy. Expect higher hut costs and need to book well in advance. The weather is most stable, but afternoons can bring thunderstorms.
March to April: Autumn offers spectacular conditions with golden beech forests, stable weather, and fewer hikers. This is arguably the best time to hike the Kepler Track. Temperatures are cooler but pleasant for hiking, and autumn light creates beautiful photography conditions.
Winter Season (May to October)
Winter transforms the Kepler Track into a serious alpine undertaking. The exposed ridgeline section often has snow and ice, requiring mountaineering skills, crampons, and ice axes. Avalanche danger is real.
Only experienced alpine trampers should attempt the Kepler Track in winter. Most winter hikers skip the alpine section entirely, using the Forest Burn Track alternate route.
Advantages: Solitude, beautiful snow-covered landscapes, no bookings required, and cheap hut fees.
Disadvantages: Dangerous conditions, shorter daylight hours, cold temperatures, potential hut closures, and limited facilities.
Weather Considerations
Fiordland receives substantial rainfall (over 2,000mm annually in Te Anau, much more in the mountains). Rain is possible any month, so proper gear is essential regardless of season.
The alpine ridgeline creates its own weather. Conditions can be perfect at Luxmore Hut, but stormy on the ridge. Always check forecasts and heed hut warden advice about ridgeline conditions.
What to Pack for the Kepler Track
Proper packing makes the difference between a comfortable trek and a miserable slog. Here’s a comprehensive Kepler Track packing list.
The Ten Essentials
- Navigation: Map, compass, GPS device, or smartphone with offline maps
- Sun Protection: Sunscreen (SPF 50+), sunglasses, hat with brim
- Insulation: Warm layer, including down or synthetic jacket
- Illumination: Headlamp with extra batteries
- First-Aid Supplies: Comprehensive kit including blister treatment
- Fire: Waterproof matches or lighter (for emergency)
- Repair Kit: Duct tape, safety pins, sewing kit
- Nutrition: Extra food beyond planned meals
- Hydration: Water bottles or bladder (2-3 liters capacity)
- Emergency Shelter: Lightweight emergency bivy or space blanket
Clothing Checklist
Base Layers:
- 2-3 merino wool or synthetic T-shirts
- 1 long-sleeve base layer top
- 2 pairs of hiking underwear
- 2 pairs of merino wool hiking socks
- 1 pair thermal leggings (for cold mornings/evenings)
Mid Layers:
- Fleece or synthetic insulated jacket
- Down jacket or vest for hut evenings
Outer Layers:
- Waterproof rain jacket (essential)
- Waterproof rain pants (don’t skip these)
- Hiking pants or shorts
- Beanie or warm hat
- Gloves (even in summer for the alpine section)
- Buff or neck gaiter
Footwear:
- Broken-in hiking boots with ankle support (mandatory)
- Camp shoes or sandals for hut evenings
- Gaiters (recommended, especially in damp conditions)
Sleeping Gear
- Sleeping bag rated to 0-5°C (summer) or -10°C (shoulder season)
- Sleeping bag liner (adds warmth and keeps bag clean)
- Travel pillow or stuff sack filled with clothes
Cooking and Eating
Huts have gas cookers, but bring:
- Lightweight pot or mess kit
- Mug or cup
- Spork or utensils
- Plate or bowl
- Lighter or matches
- Biodegradable soap (small amount)
- Microfiber towel
- Water purification tablets (backup)
Food Suggestions
Plan for high-calorie, lightweight meals:
Breakfasts: Instant oatmeal, muesli, powdered milk, instant coffee/tea, energy bars
Lunches: Crackers, cheese, salami, nuts, dried fruit, chocolate, trail mix, energy bars
Dinners: Dehydrated meals, instant rice or couscous, packet soup, instant mashed potatoes
Snacks: Energy gels, candy, cookies, beef jerky, electrolyte drink mix
Pack 20% more food than you think you’ll need. Hiking burns tremendous calories, and you’ll want treats at huts.
Personal Items
- Toiletries (toothbrush, toothpaste, biodegradable soap, hand sanitizer)
- Toilet paper (small amount as backup)
- Prescription medications
- Sunscreen and lip balm
- Insect repellent (sandflies are brutal)
- Personal locator beacon (PLB) or satellite messenger (recommended)
- Mobile phone with emergency numbers
- Booking confirmation printout
- Cash or card for water taxis/shuttles
- Camera and extra batteries
- Book or cards for hut downtime
- Earplugs (huts can be noisy)
What NOT to Bring
- Cotton clothing (stays wet, loses warmth)
- Heavy jeans
- New, unbroken boots
- Excessive electronics
- Alcohol (not prohibited, but adds weight)
- Disposable plastics (pack out all rubbish)
Kepler Track Day Walks
Can’t commit to 3-4 days? The Kepler Track offers excellent day hiking options that showcase its beauty without requiring hut bookings or multi-day commitment.
Luxmore Day Walk (Return to Luxmore Hut)
Distance: 27.6 km return
Time: 8-10 hours return
Difficulty: Challenging
Highlights: Full forest and alpine experience
This ambitious day walk takes you from Control Gates to Luxmore Hut and back. You’ll experience the forest ascent and alpine environment but skip the logistics of hut bookings. Start very early to ensure you return before dark. This walk is only suitable for fit, experienced hikers.
Brod Bay to Luxmore Hut
Distance: 19.6 km return
Time: 6-8 hours return
Difficulty: Moderate to challenging
Highlights: Shorter approach to the alpine section
Starting from Brod Bay (accessible by water taxi) cuts distance compared to Control Gates, making Luxmore Hut more achievable as a day walk. This is still a serious undertaking with significant elevation gain.
Lakeside Track
Distance: 5.3 km one way
Time: 1.5-2 hours one way
Difficulty: Easy
Highlights: Gentle lakeside walking, suitable for families
The easiest Kepler Track section follows the lakeshore between Control Gates and Brod Bay. Mostly flat through beech forest with lake views, this makes a perfect family-friendly walk or gentle introduction to the track. Arrange water taxi for one direction to avoid retracing steps.
Forest Burn Track (Luxmore Hut Alternative Route)
Distance: 9.4 km one way
Time: 2.5-3 hours one way
Difficulty: Moderate
Highlights: Forest route bypassing the alpine section
This alternate route connects Luxmore Hut and Hanging Valley Shelter through the forest, bypassing the exposed ridgeline. Useful in bad weather or for day hikers wanting to explore different terrain. Can be combined with other sections for varied day walks.
Getting to the Kepler Track
The Kepler Track is easily accessible from Te Anau, the gateway town to Fiordland National Park.
Getting to Te Anau
From Queenstown: 170 km, approximately 2.5 hours drive via SH6 and SH94. Several bus companies offer daily services, or rent a car for flexibility.
From Invercargill: 157 km, approximately 2 hours drive via SH6 and SH94.
From Dunedin: 286 km, approximately 3.5-4 hours drive via SH1 and SH94.
Trailhead Access
The Kepler Track officially begins at the Control Gates, about 5 kilometers from Te Anau township.
Option 1 – Walk from Te Anau: Walk along the lakeside from Te Anau to Control Gates (1.5-2 hours). Many hikers choose this option, adding the scenic lakeside section to their trek.
Option 2 – Water Taxi: Several operators run water taxis from Te Anau to Brod Bay, just past Control Gates. This saves walking the lakeside section. Cost approximately $40-60 NZD per person. Bookings recommended, especially during peak season.
Option 3 – Drive and Shuttle: Drive to the Control Gates car park (free parking but limited security—don’t leave valuables). Arrange a shuttle or water taxi pickup from Rainbow Reach at the end of your hike.
Option 4 – Complete Loop Walk: Park at Control Gates, hike the entire loop, and walk the final 5.3 km from Rainbow Reach back to your car.
Parking Considerations
Control Gates car park offers free parking but is not monitored. Don’t leave valuables visible. Some hikers park in Te Anau (paid parking with better security) and walk or take a water taxi to the trailhead.
Kepler Track Difficulty and Fitness Requirements
The Kepler Track is classified as moderate to challenging, suitable for reasonably fit hikers with some tramping experience.
Physical Fitness Requirements
Minimum Fitness: You should be comfortable hiking 10-15 km per day with a 10-15 kg pack on varied terrain. The track involves sustained ascents, descents, and several hours above treeline on exposed terrain.
Training Recommendations: Spend 6-8 weeks before your hike doing:
- Regular walks with increasing distance (build to 15 km)
- Hill training with a loaded pack
- Stair climbing or step training
- Leg strengthening exercises (squats, lunges)
Technical Difficulty
Track Condition: Well-maintained throughout with good footing, though alpine sections can be rocky. Some steep sections with steps or staircases.
Navigation: Track is well-marked with orange triangles in the forest and orange poles above the bushline. Navigation skills are helpful but not essential in good weather. In poor visibility on the ridgeline, competent map and compass skills become important.
Exposure: The alpine ridgeline has significant exposure with steep drop-offs on both sides. Not suitable for those uncomfortable with heights or exposure. In strong winds, the ridgeline can be genuinely dangerous.
River Crossings: No major river crossings on the main track. Small stream crossings on bridges or stepping stones.
Mental Preparation
Success on the Kepler Track requires mental resilience for:
- Long days carrying a heavy pack
- Hiking in the rain (very likely at some point)
- Sleeping in huts with strangers and noise
- Limited facilities and comfort
- Potential weather delays or challenges
Safety on the Kepler Track
While the Kepler Track is well-maintained and heavily traveled, backcountry risks remain.
Alpine Hazards
The exposed ridgeline section presents serious hazards:
Weather Changes: Conditions can deteriorate rapidly. Start early to complete the alpine section before the afternoon weather. If forecasts predict severe weather, wait at Luxmore Hut or use the Forest Burn alternate route.
Exposure: The ridgeline has steep drop-offs. Take care in strong winds, which can literally knock hikers off their feet.
Lightning: The ridgeline is highly exposed during thunderstorms. If caught in a storm, descend immediately or shelter in the Hanging Valley emergency shelter.
Snow and Ice: Even in summer, sudden snow can fall on the alpine sections. In shoulder seasons, morning ice on the track is common. If significant snow is present, consider the alternate route unless you have crampons and alpine skills.
Emergency Procedures
In an emergency:
- Stay calm and assess the situation
- Provide first aid if needed
- Call 111 (New Zealand emergency) if you have cell reception
- Activate PLB if you have one
- Stay put if seriously injured, keep warm
- Send for help if in a group
Cell Coverage: Patchy at best. Some reception near huts and ridgelines, but don’t rely on it.
Hut Wardens: During peak season, wardens staff the huts and can assist with emergencies and weather advice.
Weather and Conditions
Check forecasts before departing:
- MetService New Zealand (www.metservice.com)
- Mountain Safety Council avalanche forecasts (winter)
- DOC website for track alerts
Fiordland weather is notoriously unpredictable. Be prepared for rain, wind, cold, and sunshine—all in one day.
Water Safety
Drinking Water: Stream water is generally safe but giardia (parasitic illness) is present in Fiordland. Boil water or use purification tablets, especially from lower elevation streams.
Dehydration: Carry adequate water, especially on Day 1 climb to Luxmore Hut where water sources are limited.
Comparing the Kepler Track to Other Great Walks
How does the Kepler Track stack up against New Zealand’s other famous multi-day hikes?
Kepler Track vs Milford Track
The Milford Track is often called “the finest walk in the world” and is more famous internationally, but many hikers prefer the Kepler Track.
Milford Advantages: More dramatic scenery with Sutherland Falls and Mackinnon Pass, better weather chance (slightly), more wilderness feel.
Kepler Advantages: Loop configuration (easier logistics), superior alpine ridgeline experience, less crowded, more flexible booking, accessible day walk options.
Difficulty: Similar overall difficulty, though Milford has more rain and mud.
Kepler Track vs Routeburn Track
The Routeburn Track connects Fiordland to Mount Aspiring National Park with stunning alpine scenery.
Routeburn Advantages: More diverse scenery spanning two national parks, slightly shorter (32 km), famous for dramatic mountain vistas.
Kepler Advantages: Loop configuration, longer alpine section, easier access from Te Anau, less expensive (no shuttle required), better for wildlife viewing.
Difficulty: Routeburn is slightly easier with less elevation gain and shorter distance.
Kepler Track vs Other Great Walks
Abel Tasman: Completely different experience (coastal, beaches, sea kayaking option). Much easier terrain but less dramatic scenery.
Heaphy Track: Longer (78 km, 4-6 days), more remote, different West Coast landscapes. More challenging logistics.
Tongariro Northern Circuit: Volcanic alpine environment, similar difficulty, but different scenery. Desert-like rather than lush.
The Kepler Track Best For: Hikers wanting a complete alpine experience with good logistics, diverse landscapes, and manageable difficulty. Ideal first Great Walk for many trampers.
Frequently Asked Questions About the Kepler Track
How long does the Kepler Track take?
Most hikers complete the Kepler Track in 3-4 days. Fit, experienced hikers can do it in 2 days (very challenging), while others take 4 days for a more relaxed pace. The standard itinerary is 3 nights in huts over 4 days of hiking.
Do I need to book the Kepler Track?
Yes, during the Great Walks season (late October to late April), hut bookings are mandatory and must be made through the DOC website. In winter (May to October), bookings aren’t required, but conditions are much more challenging.
How difficult is the Kepler Track?
The Kepler Track is rated moderate to challenging. It requires reasonable fitness and some hiking experience. The main challenges are the sustained climb to Luxmore Hut (Day 1), the exposed alpine ridgeline (Day 2), and carrying a multi-day pack. Most moderately fit people who train properly can complete it successfully.
Can I wild camp on the Kepler Track?
No. Camping is not permitted on the Kepler Track during the Great Walks season. You must stay in the designated huts. In winter, camping is technically allowed, but conditions make it impractical for most hikers.
What happens if the weather is bad on ridge day?
If the weather is dangerous on Day 2, you have several options: wait at Luxmore Hut for conditions to improve, take the Forest Burn Track alternate route through the forest that bypasses the ridgeline, or, in extreme cases, turn back. Hut wardens provide weather advice during peak season.
Is the Kepler Track suitable for beginners?
The Kepler Track can be suitable for beginners with good fitness who prepare properly. However, it’s not recommended as your first-ever multi-day hike. Complete some shorter overnight hikes first to understand what’s involved. If this is your first Great Walk, consider going with experienced friends or a guided group.
Can I hike the Kepler Track clockwise?
Yes, though counterclockwise is more popular. Clockwise means you tackle the alpine section on Day 3 instead of Day 2. Some prefer this for better acclimatization, while others prefer doing the challenging section while fresh. Counterclockwise is generally recommended.
Are there sandflies on the Kepler Track?
Yes, particularly in lower forest sections near water. Sandflies are worst at Iris Burn Hut and Moturau Hut. Bring a strong insect repellent and apply it liberally, especially during rest breaks and at huts. They’re less problematic at Luxmore Hut (too high in elevation) and while walking.
What if I can’t get hut bookings?
If you can’t secure bookings for your preferred dates, try: checking regularly for cancellations, being flexible with dates (weekdays easier than weekends), considering shoulder season, or hiking during winter (though this requires appropriate skills and equipment). Alternatively, consider other Great Walks with better availability.
Can I bring my dog?
No. Dogs are not permitted on the Kepler Track at any time. Fiordland National Park protects native wildlife, and dogs are prohibited throughout.
Is there cell phone reception?
Very limited. You may get occasional reception at huts and on the alpine ridgeline, but don’t count on it. Download offline maps before you go and inform someone of your plans. Consider bringing a personal locator beacon (PLB) for emergencies.
Do I need hiking poles?
Not essential but highly recommended. Poles help significantly with balance, reducing strain on knees during descents, and providing stability on steep sections and river crossings. Most experienced trampers use them.
Essential Tips for Hiking the Kepler Track
Book Early: Popular dates sell out within hours of bookings opening. Set calendar reminders and be ready when bookings open in early July.
Start Early Each Day: Begin hiking by 7-8 AM. This gives you ample time, allows tackling the alpine section before the weather deteriorates, and ensures daylight margin for slower-than-expected progress.
Pack Light: Every kilogram matters over 60 kilometers. Weigh everything, eliminate duplicates, and choose lightweight options. Your back will thank you.
Break In Your Boots: Wear your hiking boots on multiple training walks before the trip. Blisters can ruin your Kepler Track experience. If you develop hot spots, address them immediately with blister treatment.
Check Weather Obsessively: Weather changes rapidly in Fiordland. Check forecasts at each hut and talk to wardens. Be flexible with plans if conditions deteriorate.
Carry Extra Food: Always pack more food than you think you’ll need. Hiking burns enormous calories, and having extra snacks makes a huge difference to energy and morale.
Protect Against Sandflies: Apply repellent liberally and reapply regularly. Sandfly bites itch intensely and can ruin hut evenings. DEET-based repellents work best.
Waterproof Everything: Keep extra clothes, a sleeping bag, and electronics in waterproof bags inside your pack. Fiordland gets serious rain, and you’ll want dry clothes at huts.
Respect Hut Etiquette: Keep noise down after 10 PM, clean up cooking areas, hang wet gear appropriately, and be considerate of others. Huts can feel crowded, so good etiquette makes everyone’s experience better.
Take Photos at Luxmore: The sunrise from Luxmore Hut is spectacular. Set your alarm early for magical golden hour photography before other hikers wake.
Kepler Track for International Visitors
If you’re traveling to New Zealand specifically to hike the Kepler Track, here are important considerations:
Planning Your New Zealand Itinerary
Suggested Timeframe: Allow at least 6-7 days for the Kepler Track experience:
- Day 1: Arrive Queenstown, pick up rental car, drive to Te Anau
- Day 2: Rest day, gear check, final preparations
- Days 3-6: Kepler Track (3-4 days)
- Day 7: Return to Queenstown or continue to Milford Sound
Combining Attractions: Te Anau is perfectly positioned for:
- Milford Sound day trips (2.5 hours drive)
- Doubtful Sound tours
- Glowworm caves
- Manapouri day walks
- Queenstown activities (2.5 hours away)
Gear Rental in Te Anau
Don’t want to fly with hiking gear? Several Te Anau outfitters rent quality equipment:
Available Rentals: Backpacks (60-70L), sleeping bags, hiking boots, rain gear, cooking equipment, trekking poles, PLBs
Expect to pay approximately $100-200 NZD for a complete gear package for 3-4 days. Book rentals in advance during peak season.
Travel Insurance
Strongly recommended for international visitors. Ensure your policy covers:
- Tramping/hiking up to 1,500 meters in elevation
- Emergency rescue and evacuation
- Medical treatment in New Zealand
- Trip cancellation/interruption
- Lost or damaged gear
Environmental Responsibility on the Kepler Track
The Kepler Track passes through pristine wilderness that requires careful stewardship. Follow Leave No Trace principles to protect this special environment.
Track Rules and Etiquette
Stay on Track: Don’t shortcut switchbacks or create new trails. Erosion damage takes years to repair in alpine environments.
Pack Out All Rubbish: Huts have no rubbish collection. Carry out everything you carry in, including food wrappers, orange peels, and toilet paper.
Respect Wildlife: Don’t feed birds (including kea), maintain distance from wildlife, and never disturb nesting sites. Kea are protected and extremely curious—secure your gear at Luxmore Hut.
Water Sources: Don’t contaminate streams or lakes. Wash at least 50 meters from water sources, use biodegradable soap sparingly, and never soap directly in streams.
Toilet Facilities: Use hut toilets whenever possible. If you must go between huts, dig a hole 15 cm deep at least 50 meters from water sources and tracks. Pack out toilet paper.
Training Plan for the Kepler Track
Proper preparation dramatically improves your Kepler Track experience. Here’s an 8-week training plan.
Weeks 1-2: Base Building
Goal: Establish hiking baseline, test gear
- 2-3 walks per week, 5-8 km each on varied terrain
- One longer walk on weekends, 10-12 km
- Practice with a daypack (5-7 kg)
- Start wearing hiking boots to break them in
Weeks 3-4: Increase Distance and Weight
Goal: Build endurance and strength
- 3 walks per week, 8-12 km each
- Weekend walks increase to 15-18 km
- Add weight to pack (10-12 kg)
- Include 2 sessions of leg strengthening (squats, lunges, step-ups)
Weeks 5-6: Peak Training
Goal: Simulate Kepler Track conditions
- 3-4 walks per week, 10-15 km
- Weekend walks 18-20 km with full pack weight (15 kg)
- Practice sustained uphill hiking for 1-2 hours
- Complete at least one practice hike with a similar elevation gain to Day 1 (900m)
Weeks 7-8: Taper and Prepare
Goal: Rest and fine-tune
- Reduce distance but maintain frequency
- Focus on recovery and flexibility
- Walks 8-12 km with moderate pack weight
- Final gear checks and adjustments
- Rest completely for 2 days before departure
Kepler Track History and Culture
Understanding the history and cultural significance of the Kepler Track enriches your hiking experience.
Track Development
The Kepler Track is relatively young compared to New Zealand’s other Great Walks. Completed in 1988, it was purpose-built to:
- Reduce pressure on the overcrowded Milford Track
- Showcase Fiordland’s diverse landscapes in a manageable loop
- Provide economic benefits to Te Anau
- Offer superior facilities with well-designed huts
The track took four years to construct, requiring extensive environmental assessment and careful route selection to minimize impact on pristine wilderness while maximizing scenic value.
Māori History
The Fiordland region, known as Te Rua-o-te-moko (the pit of tattooing) in Māori, has deep cultural significance. While Māori didn’t permanently settle in Fiordland due to its harsh conditions, they regularly traveled through for seasonal hunting and gathering.
Māori harvested tītī (muttonbirds), kākāpō, kea, and other birds, and collected pounamu (greenstone) from remote valleys. Traditional routes through Fiordland connected coastal settlements with inland resources.
Guided vs Independent Hiking
Should you hike the Kepler Track independently or with a guided group? Both options have advantages.
Independent Hiking
Advantages:
- Lower cost (only hut fees)
- Flexible schedule and pace
- Freedom to stop when and where you want
- Greater sense of accomplishment
Best For: Experienced hikers, those on tight budgets, and people who prefer independence and flexibility.
Guided Hiking
Several companies offer guided Kepler Track experiences at varying levels of luxury.
Standard Guided Walks: Professional guide, use DOC huts, carry your own gear, some meals provided. Cost: approximately $1,500-2,000 NZD.
Luxury Guided Walks: Stay in private lodges, all meals included (gourmet quality), guides carry group gear, you carry only a daypack. Cost: $3,000-4,000+ NZD.
Advantages: Expert local knowledge, enhanced safety, better meals, less planning stress, social experience, and environmental education.
Best For: First-time trampers, those who prefer comfort, solo travelers seeking companionship, hikers who want educational interpretation.
After the Kepler Track: Recovery and Next Steps
Congratulations! You’ve completed the Kepler Track. Here’s how to recover and plan your next adventure.
Immediate Recovery
First 24 Hours:
- Rehydrate extensively (water, electrolyte drinks)
- Eat substantial meals with protein and carbohydrates
- Take a hot shower
- Treat any blisters or injuries
- Elevate feet to reduce swelling
- Gentle stretching
Planning Your Next Great Walk
Loved the Kepler Track? New Zealand has eight other Great Walks, each offering unique experiences:
- Milford Track – 53.5 km, 4 days, most famous
- Routeburn Track – 32 km, 2-3 days, stunning alpine scenery
- Abel Tasman Coast Track – 60 km, 3-5 days, beaches and bays
- Heaphy Track – 78.4 km, 4-6 days, West Coast wilderness
- Tongariro Northern Circuit – 43.1 km, 3-4 days, volcanic landscapes
- Whanganui Journey – 145 km, 3-5 days, canoe journey
- Lake Waikaremoana Track – 46 km, 3-4 days, forested lake circuit
- Rakiura Track – 32 km, 3 days, Stewart Island wilderness
- Paparoa Track – 55 km, 2-3 days, newest Great Walk
Conclusion: Your Kepler Track Adventure Awaits
The Kepler Track offers one of New Zealand’s finest tramping experiences, combining accessible logistics with genuine wilderness adventure. From the challenging climb to Luxmore Hut, across the spectacular alpine ridgeline, through ancient beech forests, and along pristine lakeshores, the Kepler Track showcases Fiordland’s incredible diversity.
With proper planning, training, and gear, the 60-kilometer Kepler Track loop is achievable for most reasonably fit hikers. The memories of standing on the exposed ridgeline with panoramic views across Fiordland, listening to tui and bellbirds in ancient forests, and sharing hut evenings with fellow trampers will stay with you long after your boots are back in the closet.
Start planning your Kepler Track adventure today. Book your huts as soon as reservations open, begin your training program, gather your gear, and prepare for one of the world’s great hiking experiences. The mountains are calling, and the Kepler Track awaits.
Quick Reference Summary
Essential Information:
- Distance: 60 km loop
- Duration: 3-4 days
- Booking: DOC website, reserve 9+ months ahead for peak season
- Cost: $75-140 NZD per hut night
- Season: Late October – Late April (summer)
- Start/End: Control Gates, Te Anau (5 km from town)
- Difficulty: Moderate to challenging
- Highest Point: 1,472 meters (Mount Luxmore)
Don’t Forget:
- Book huts well in advance
- Break in boots before departure
- Pack rain gear (guaranteed Fiordland rain)
- Bring insect repellent for sandflies
- Start early each day
- Check the weather obsessively
- Respect track rules and hut etiquette
- Carry adequate food and water
- Download offline maps
- Tell someone your plans
Emergency Contacts:
- New Zealand Emergency Services: 111
- DOC Emergency Hotline: 0800 362 468
- Mountain rescue coordination via 111
The Kepler Track is ready for you. Are you ready for the Kepler Track?
About This Guide: This comprehensive Kepler Track guide is regularly updated with current information, booking details, and practical advice. Last updated October 2025. For official track conditions and closures, always check the DOC website before your trip.
Share Your Experience: Completed the Kepler Track? Share your tips, photos, and experiences to help future hikers plan their adventures.
Safe tramping, and enjoy one of New Zealand’s most spectacular Great Walks!